用python控制dynamixel ax-12+伺服的库
pyax12的Python项目详细描述
PyAX-12
版权所有(C)20102015 Jeremie Decock(http://www.jdhp.org)
- 网站:http://www.jdhp.org/projects_en.html#pyax12
- 联机文档:http://pyax-12.readthedocs.org
- 源代码:https://github.com/jeremiedecock/pyax12
- 问题跟踪器:https://github.com/jeremiedecock/pyax12/issues
- pypi上的pyax-12:https://pypi.python.org/pypi/pyax12
说明
PyAX-12是要控制的开源轻量级python库 Dynamixel AX-12+执行器。
注意:
This project is still in beta stage, so the API is not finalized yet.
依赖性
- python>;=3.0
- Python-serial
pyax-12在gnu/linux(debian 8)和macosx下被测试为与python 3.4一起工作。 (Mavericks 10.9)和Windows(7)。 最新gnu/linux、maxosx和windows系统下的任何python 3.x版本 也应该适合。
pyax-12也可以通过gpio连接器在Raspberry Pi上运行。
Python-serial是安装pyax-12所需的唯一依赖项。
注意:
If you use ^{tt1}$ to install PyAX-12, Python-serial will be automatically downloaded and installed (see the following install section).
安装
gnu/linux
您可以使用以下命令安装、升级和卸载pyax-12(在 终端):
pip install --pre pyax12
pip install --upgrade pyax12
pip uninstall pyax12
或者,如果您下载了pyax-12源代码:
python3 setup.py install
窗口
您可以使用以下命令安装、升级和卸载pyax-12(在 command prompt):
py -m pip install --pre pyax12
py -m pip install --upgrade pyax12
py -m pip uninstall pyax12
或者,如果您下载了pyax-12源代码:
py setup.py install
macosx
您可以使用以下命令安装、升级和卸载pyax-12(在 终端):
pip install --pre pyax12
pip install --upgrade pyax12
pip uninstall pyax12
或者,如果您下载了pyax-12源代码:
python3 setup.py install
硬件设置
Official AX-12 documentation(存档)。
通过usb端口将ax-12执行器连接到计算机(包括覆盆子pi计算机)
可以使用USB2Dynamixel将ax-12执行器连接到计算机。 实际上,任何ftdi串行/usb转换器设备都应该做这项工作。
有关usb2dynamixel设置的更多信息,请检查 official documentation。
通过gpio端口将ax-12执行器连接到覆盆子pi
需要一个小的电子电路来转换覆盆子脉冲信号(开 RX和TX管脚)连接到dynamixels所需的半双工管脚(请参见 this archive)。
将全双工转换为半双工的芯片是74HC126/74HC04 或74LS241。
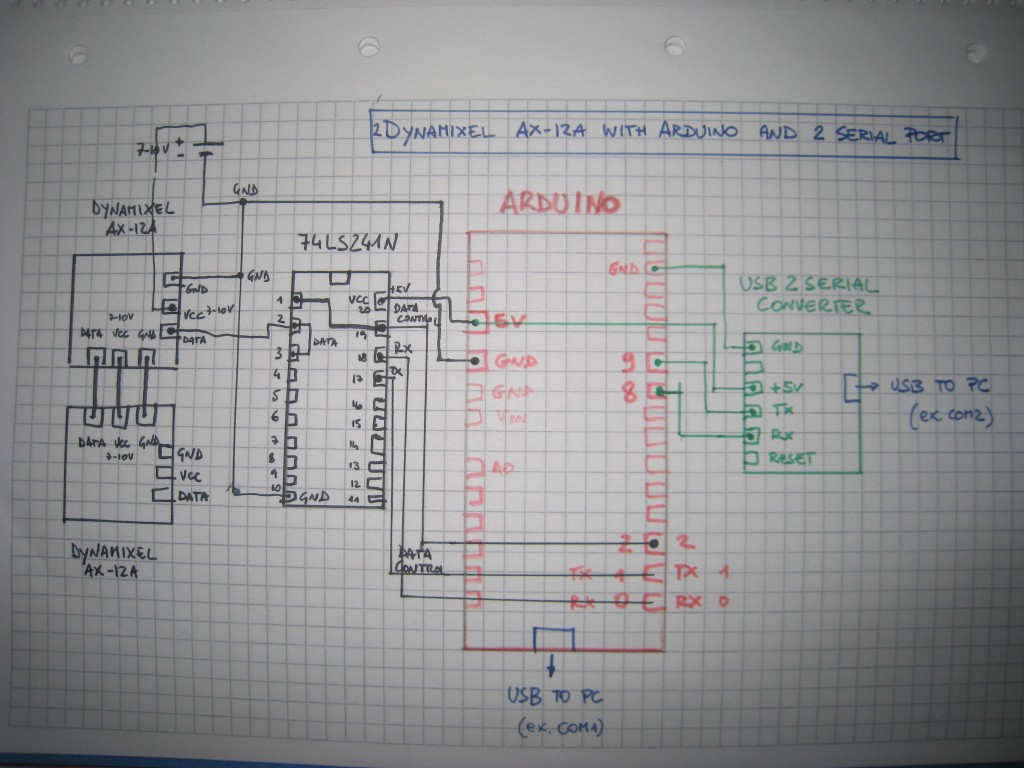
使用74LS241控制dynamixel ax-12
以下是控制dynamixel所需的电子电路示意图 带有74LS241的斧头-12。
有关其他说明,请参见以下页面:
- http://www.oppedijk.com/robotics/control-dynamixel-with-raspberrypi
- http://memememememememe.me/post/the-dynamixel-ax-12a-servos/
- http://robottini.altervista.org/dynamixel-ax-12a-and-arduino-how-to-use-the-serial-port
- http://savageelectronics.blogspot.fr/2011/01/arduino-y-dynamixel-ax-12.html
Thiago Hersan的印刷电路板在这里免费提供:
对于其他示意图,请检查以下页面:
UART配置
将带宽增加到1Mbps可能需要特殊设置(未测试 但是):
否则,将带宽保持在57600bps应该是现成的 (确保使用正确的dynamixel id和dynamixel带宽 正确设置为56700bps)。
示例用法
在下面的示例中,dynamixel_id、port和baudrate 应根据您的配置调整值:
- 对于linux用户:
- port值应该类似于
- “/天ev/ttys0“,”/dev/ttys1“,…如果您使用实际的串行端口
- “/dev/ttyusb0”、“/dev/ttyusb1”……如果使用
USB to serial适配器 (就像USB2Dynamixel适配器一样)
- baudrate值应与中配置的值相同 dynamixel单位
- port值应该类似于
- 对于windows用户:
- port值应该类似于“com2”、“com3”…(请参见 com端口在windows中的配置device manager)
- baudrate值应与中配置的值相同 dynamixel单元和窗口device manager(即检查 com端口在windows中的配置device manager)
- 对于macosx用户:
- port值应该类似于“/dev/tty.usbserial xxx”
使用
USB to serial适配器,如USB2Dynamixel适配器 - baudrate值应与中配置的值相同 dynamixel单位
- port值应该类似于“/dev/tty.usbserial xxx”
使用
- 对于raspberry pi用户:
- 如果你想通过gpio连接器控制ax-12执行器,别忘了 在Connection构造函数中将rpi_gpio设置为True(检查 以下第一个示例)
- port值应该是“/dev/ttyama0”
如果使用USB2Dynamixel设备,请确保其开关设置为“ttl”。
其他一些例子可以在examples目录中找到。
ping动态像素
如果指定的dynamixel单元已连接并且
在给定的baudrate中可用;否则它将打印False。
from pyax12.connection import Connection

# Connect to the serial port
serial_connection = Connection(port="/dev/ttyUSB0", baudrate=57600)

dynamixel_id = 3

# Ping the third dynamixel unit
is_available = serial_connection.ping(dynamixel_id)

print(is_available)

# Close the serial connection
serial_connection.close()
将ax-12执行器连接到gpio连接器的覆盆子pi用户应该 请改用以下代码:
from pyax12.connection import Connection

# Connect to the serial port
serial_connection = Connection(port="/dev/ttyAMA0", rpi_gpio=True)

dynamixel_id = 3

# Ping the third dynamixel unit
is_available = serial_connection.ping(dynamixel_id)

print(is_available)

# Close the serial connection
serial_connection.close()
扫描(搜索可用的dynamixel单位)
此代码段打印连接的可用dynamixel单元的id列表(位于
给定的baudrate)。
from pyax12.connection import Connection

# Connect to the serial port
serial_connection = Connection(port="/dev/ttyUSB0", baudrate=57600)

# Ping the dynamixel unit(s)
ids_available = serial_connection.scan()

for dynamixel_id in ids_available:
    print(dynamixel_id)

# Close the serial connection
serial_connection.close()
打印第一个dynamixel单元的控制表
此代码段打印指定dynamixel单元的控制表(即 dynamixel单元的内部状态信息)。
from pyax12.connection import Connection

# Connect to the serial port
serial_connection = Connection(port="/dev/ttyUSB0", baudrate=57600)

dynamixel_id = 1

# Print the control table of the specified Dynamixel unit
serial_connection.pretty_print_control_table(dynamixel_id)

# Close the serial connection
serial_connection.close()
这个片段应该打印如下内容:
model_number................. AX-12+
firmware_version............. 24
id........................... 1
baud_rate.................... 57142.9 bps
return_delay_time............ 500 µs
cw_angle_limit............... -150.0° (0)
ccw_angle_limit.............. 150.0° (1023)
max_temperature.............. 70°C
min_voltage.................. 6.0V
max_voltage.................. 14.0V
max_torque................... 1023
status_return_level.......... 2 (respond to all instructions)
input_voltage_alarm_led...... off
angle_limit_alarm_led........ off
overheating_alarm_led........ on
range_alarm_led.............. off
checksum_alarm_led........... off
overload_alarm_led........... on
instruction_alarm_led........ off
input_voltage_alarm_shutdown. off
angle_limit_alarm_shutdown... off
overheating_alarm_shutdown... on
range_alarm_shutdown......... off
checksum_alarm_shutdown...... off
overload_alarm_shutdown...... on
instruction_alarm_shutdown... off
down_calibration............. 46
up_calibration............... 972
torque_enabled............... yes
led.......................... off
cw_compliance_margin......... 0.3° (1)
ccw_compliance_margin........ 0.3° (1)
cw_compliance_slope.......... 9.4° (32)
ccw_compliance_slope......... 9.4° (32)
goal_position................ -0.1° (511)
moving_speed................. 512
torque_limit................. 1023
present_position............. -0.1° (511)
present_speed................ 0
present_load................. 0
present_voltage.............. 12.1V
present_temperature.......... 43°C
registred_instruction........ no
moving....................... no
locked....................... no
punch........................ 32
将第一个dynamixel单元移动到不同的位置角度
这个片段将第一个dynamixel单元移动到0°,然后是-45°,-90°,-135°, - 150°(最大CW角),+150°(最大CW角),+135°,+90°,+45° 最后回到0°。
from pyax12.connection import Connection
import time

# Connect to the serial port
serial_connection = Connection(port="/dev/ttyUSB0", baudrate=57600)

dynamixel_id = 1

# Go to 0°
serial_connection.goto(dynamixel_id, 0, speed=512, degrees=True)
time.sleep(1)    # Wait 1 second

# Go to -45° (45° CW)
serial_connection.goto(dynamixel_id, -45, speed=512, degrees=True)
time.sleep(1)    # Wait 1 second

# Go to -90° (90° CW)
serial_connection.goto(dynamixel_id, -90, speed=512, degrees=True)
time.sleep(1)    # Wait 1 second

# Go to -135° (135° CW)
serial_connection.goto(dynamixel_id, -135, speed=512, degrees=True)
time.sleep(1)    # Wait 1 second

# Go to -150° (150° CW)
serial_connection.goto(dynamixel_id, -150, speed=512, degrees=True)
time.sleep(1)    # Wait 1 second

# Go to +150° (150° CCW)
serial_connection.goto(dynamixel_id, 150, speed=512, degrees=True)
time.sleep(2)    # Wait 2 seconds

# Go to +135° (135° CCW)
serial_connection.goto(dynamixel_id, 135, speed=512, degrees=True)
time.sleep(1)    # Wait 1 second

# Go to +90° (90° CCW)
serial_connection.goto(dynamixel_id, 90, speed=512, degrees=True)
time.sleep(1)    # Wait 1 second

# Go to +45° (45° CCW)
serial_connection.goto(dynamixel_id, 45, speed=512, degrees=True)
time.sleep(1)    # Wait 1 second

# Go back to 0°
serial_connection.goto(dynamixel_id, 0, speed=512, degrees=True)

# Close the serial connection
serial_connection.close()
相关库
控制Dynamixel AX-12+执行器的其他库在 以下(非全面)列表:
- PyPot由inria(花卉团队)提供。
- PyDynamixel作者理查德·克拉克
- Pydyn作者Fabien Benureau和Olivier Mangin(Inria Flower团队)
- Dynamixel作者:伊恩·丹福思
- dynamixel_hr作者:罗曼·雷维尔
- python_dynamixels作者:杰西·梅里特
- ax12作者thiago hersan
- Dynamixel Monitor作者:克里斯蒂安·巴尔克尼乌斯
- DynamixelMonitor作者:斯拉维克
许可证
PyAX-12库是根据 MIT License。
欢迎加入QQ群-->: 979659372

